My attempt at a guide for inserting new tiles into a tileset

Attached are two templates I use for tile insertion and an older guide that was on the compendium made by wonderful people with tools I use in this guide. Enjoy!
---------------------------------------------------
So you want to add something to an existing tileset (or- replace an existing tileset with your own art) This tutorial is for you!
For the purpose of this tutorial we will be adding a small hatch door into Lara’s room in CT from Chrono Cross:

Right there behind the chair. So currently, that doesn’t exist but we are going to fix that!
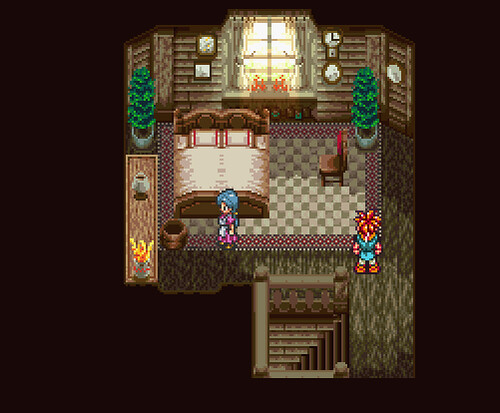
Don’t mind the double bed- that was an experiment *cough*.
So, first things first, we need to extract the tileset to make our little hatch. Each tileset is made up of 7 graphic packs. To edit Lara’s room’s tileset we are going to decompress and extract each graphic pack of the tileset, but first, we need to find them.
We will go to Lara’s room, since this is the map we want to edit and not all of Lucca’s house shares the same tileset (mostly Lucca’s room and the main entryway share two separate graphics packs that are unique to their tileset).
So, we go to Lara’s room in Temporal Flux. On the lower lefthand side we see L ½ Tilsets 2. Remember this number.

You’ll want to download my attachment CLGRH VOl I...insertion- and open the Chrono Trigger Background Graphics Info excel sheet. Open that, go to the first tab (if not already there) tileset composition. Then, in column A, look for the number 2.
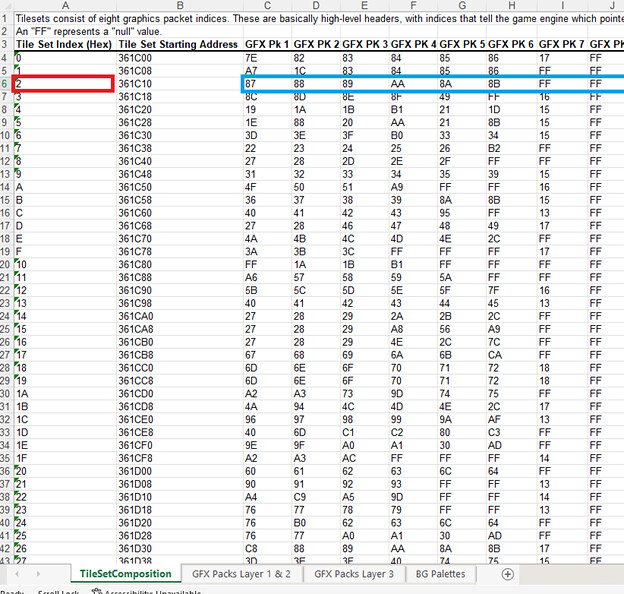
We find 2 under the tileset index, and look to the right to see the 7 Graphics packs addresses in Columns C-J with the addresses 87, 88, 89, AA, 8A, 8B.
A quick note: (Now, several tilesets in the game share graphics packs, so say, if we were replacing all 7 graphics packs with entirely new tiles, we’d have to be mindful of what other maps would be effected. For example if we wanted to change all these packs into say a tileset for a beautiful beach, there would likely be no 600 AD or 1000 AD indoor tilesets.)
Now that we have our 7 tileset addresses – you are wondering why I am not including the 8th graphics pack which is clearly listed in the excel sheet. To my knowledge its best to leave that one alone and pretend it doesn’t exist- you’ll notice that every 8th graphics pack has the same address, FF. I believe (though correct me if I’m wrong gurus) FF is an empty space – not to be confused with a usable space. So that means graphic pack 7 is also a dud, its address is FF as well. So we have 6 packs to work with for adding our own tiles.
ANyhoo! So we take our 6; 87, 88, 89, AA, 8A, and 8B and we go to the next tab in the excel sheet GFX PACK layer 1 and 2.
We look for 87 in Column A and get our address in column 3.

Oh look how fortunate, it’s a 3 for 1!
So 87’s address is 2B43A7, 88’s 2B4FFA, and 89’s is 2B5C53.
Do the same process to find AA, 8A, and 8B’s address.
Now we have
87---2B43A7 pack 1
88 ---2B4FFA pack 2
89---2B5C53 pack 3
AA---2CF61D pack 4
8A----2B67C7 pack 5
8B---2B733E pack 6
Now that we have our addresses its time to decompress and extract them! If you wanted to do a full tileset change, you’d extract all 6. We are going to extract pack 2, 88--- 2B4FFA for the purpose of this tutorial.
Go to Temporal flux and open up the rom (unheadered). Go to File > Compression

> 2B4FFA > hit the square with 3 dots > name this file something like indoor1 or whatever you fancy > hit open > then hit decompress. It will decompress to the area you chose with the name you chose. I named mine Muffinman. 😊

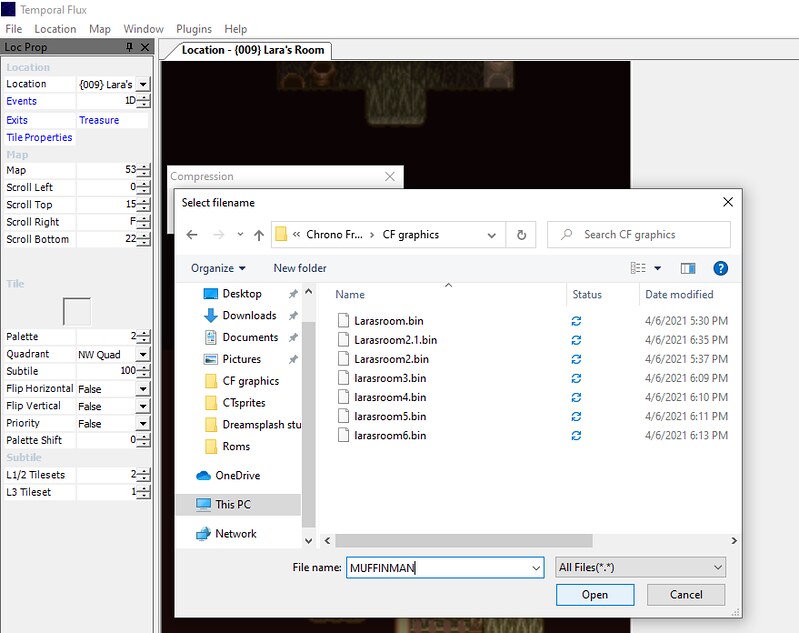
Now that we have extracted and decompressed our pack or packs, we can open them up in tilemolester make sure you have java installed and decide where we want to add our hatch.
Click file > open > (make sure you have Files of Type: All Files selected at the bottom) select what you named the decompressed file for pack 1 (2B4FFA). (mine was Muffinman).

Ahh, isn’t she glorious? Lets help us see this better. Go to View, Codec 4bpp planar, composite (2x2 bpp).
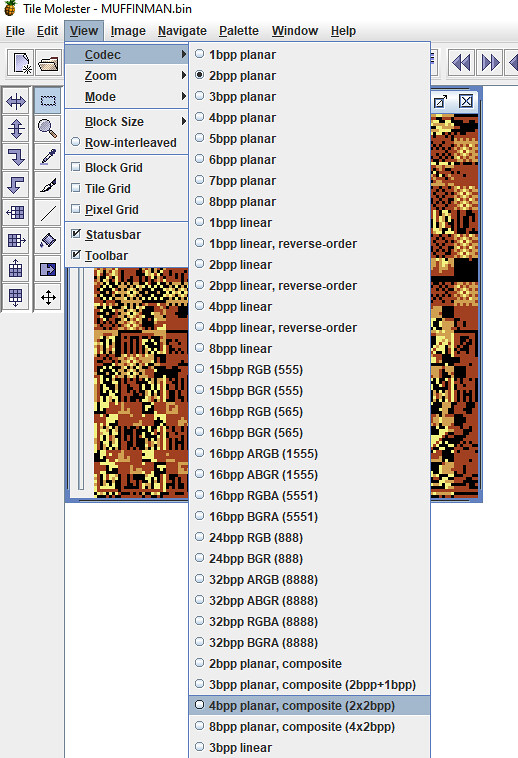
\
Vola!

She’s recognizable! We can see this is clearly some of the tiles in indoor homes, but the colors are all funky.
We will want to insert the palette so we can see what we are doing. To do that, open up the good old ZSNES or whatever emulator kids are using these days, load up a CT Rom, go to Lara’s room (or in any indoor map area but best to do Lara’s room since that’s the room we want to change and like I said, some maps share tile sets or graphics packs and lack others) and make a save state while in Lara’s room.
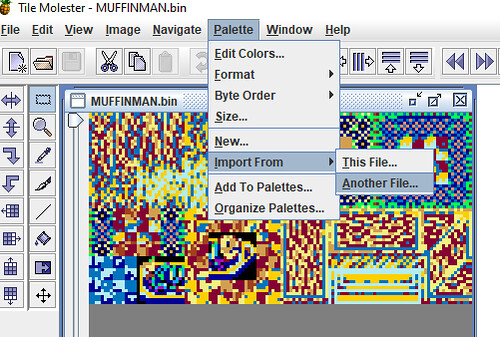
Exit, go back to tilemolester, and hit Palette > Import from > Another File >
And click on the savestate you just made. If your using ZSNES the file is whatever your rom name is .zst or zs1 if you used savestate 1 instead of 0. Mine was called ChronoFreeze.1.1zst.
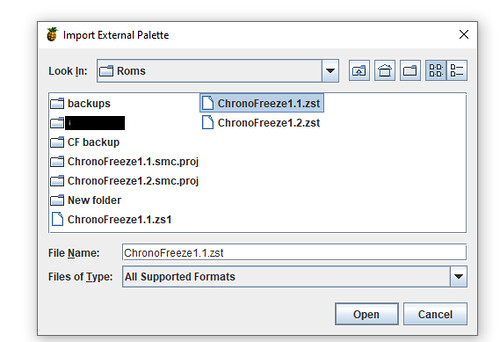
Load that sucker in and look at the bottom where there’s several colors and arrows. It loaded all the palettes in so we will want to sort to the palette we want. Keep hitting the right arrow button until it looks right.

Eventually you should get this. Note that the palette is not ‘completely accurate’ this is because different individual tiles in the pack have different palettes.
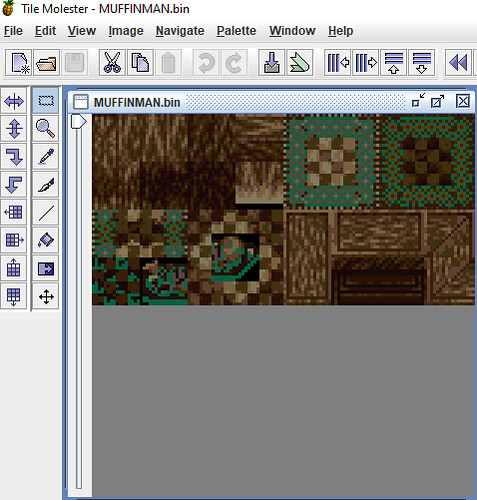
What I mean by that is -compare these two:

They are the same graphics pack with different palettes applied – for the rug we want the palette displayed in the bottom image, but since we are making a hatch which resembles the floor, we’ll stick with the first palette, the top image.
We snag that top image and take it to whatever editor we have. I tend to zoom out twice and print screen it and use Aseprite; you can use whatever image editor you like, even MS Paint in a pinch if you have nothing else.
We design our little hatch, and need to discern where it will go. It will have to replace something. We could have picked one of the other packs, which, may have had extra space, but I’m here to tell you they didn’t and this was our best option 😉.
I settled on replacing the bottom left carpet image circled in red. (I did this on the wrong example above, it should be the darker palette version).
We don’t need it (to my knowledge) because the same image is also in the upper right corner – dark beige and brown carpet squares. This MIGHT mean we might need to replace some carpets in the homes of our 1000 and 600 AD friends with the upper right tile instead of the tile we have replaced but it’s a sacrifice I’m willing to make in the name of laziness.
So, we paste our hatch over that like so:

Beautiful!
Now to compress it and ship it back into the rom!
You’ll want to save the edited graphics pack with your new tiles inserted - in this case the hatch -as the exact same size of the original image we print screened from tilemolester. So as close to the image of above – we are constrained to the height and width of this. I made a blank template, should you want to create your own tilesets/need the exact size attached as GFXtemplate.

Save it as a png, wander back to tilemolester, and we are going to import it in.
The image above, I saved as png tutorial 17 and loaded it into tile molester over the original MUFFINMAN or whatever you named your original graphics pack 1.

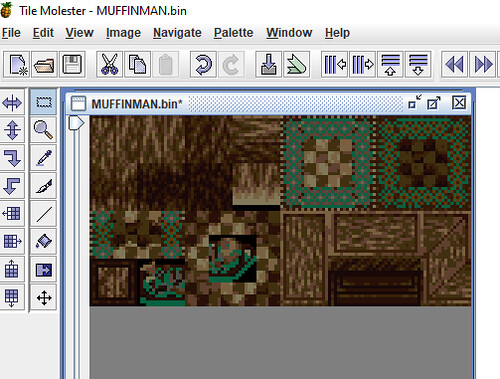
There's our hatch! We save that either under the same name or, to be safe, maybe, Muffinman1 in case we made an error. We go back to Temporal Flux, Hit File > Compression > 2B4FFA> Compress
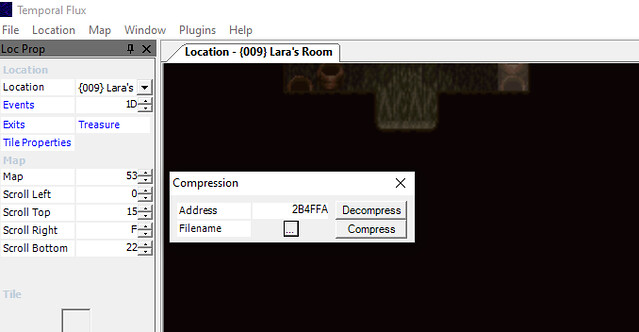
Save the Rom!
Now, you might think we are done – and in this case, we almost are! Because we pasted the hatch over an image that already existed instead of free space, we don’t need to teach Temporal Flux where it is! It’s right here:

However, Its the wrong color so let’s click on it and to the far left side you’ll see this image: \

Now we just shift the color from 4 to 5 like so and do it for all 4 quadrants. - NW, NE, SW, SE
Aaaand Vola we got a dark little hatch! We are going to replace it a little bit behind Lara’s chair.

Write to memory, save, and open up your emulator and run Crono out and back in since we saved him in this room and it wont acknowledge the changes yet.
There it be!

Now you can use the same methods to completely change entire tilesets, but, what I didn’t teach you is that when you insert something new, you’ll need a new palette, and, sometimes, you’ll need to tell TF where something is. Attached is a better tutorial than I can give which includes creating an entire new tileset, and it teaches how to change the palettes and teach TF where new inserted graphics are. 😊
Happy hacking!
EDIT: I forgot to attach the right document, Mauron has been kind enough to link to the tools you need below! Thanks Mauron! You'll want to click Mauron's link and 'Adding a new tilset' which should give you CLGRH volume I and the graphics pack info excel sheet I used earlier in the tutorial.
And of course feel free to grab and explore all the other wonderful things there!
CLGRH Volume I will help with changing palette information and teaching TF where new graphics are that you inserted. It is the guide that helped me write this one

and is vastly superior, I just dumbed it down - mostly for myself
 ***
***You'll also want to be mindful that when you compress your edited tileset back into the rom, if it exceeds a certain address you'll need to repointer.
For example when I decompress our 2nd graphics pack address 2B4FAA a at the bottom it tells us:

that it ranges from 2B4FAA to 2B5C2C - and (correct me if im wrong Mauron) as long as you don't exceed 2B5C2C you wont need to repointer.
