

 Show Posts
This section allows you to view all posts made by this member. Note that you can only see posts made in areas you currently have access to.
1
Fan Art / Nu sprites
« on: February 09, 2024, 06:20:00 pm »
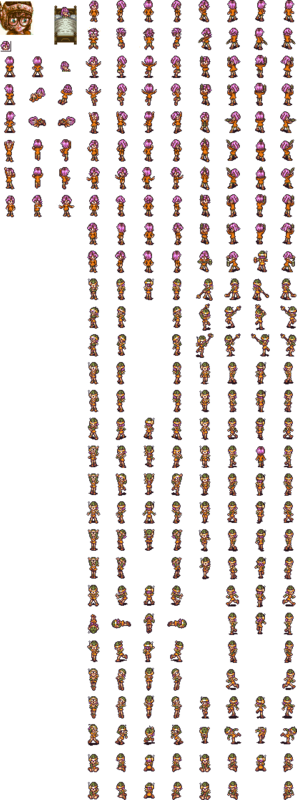
I have some Nu sprites for the new year 
Back when a bunch of us were trying to do a project for CT's 20th anniversary we came up with a Nu character named Nuwt based off the NU from the CT AMV. I think its safe for me to make him public since its been a few years

Back when a bunch of us were trying to do a project for CT's 20th anniversary we came up with a Nu character named Nuwt based off the NU from the CT AMV. I think its safe for me to make him public since its been a few years
2
Chrono Trigger Modification / Tile insertion Guide Attempt
« on: February 11, 2023, 11:51:10 am »
My attempt at a guide for inserting new tiles into a tileset
Attached are two templates I use for tile insertion and an older guide that was on the compendium made by wonderful people with tools I use in this guide. Enjoy!
---------------------------------------------------
So you want to add something to an existing tileset (or- replace an existing tileset with your own art) This tutorial is for you!
For the purpose of this tutorial we will be adding a small hatch door into Laras room in CT from Chrono Cross:

Right there behind the chair. So currently, that doesnt exist but we are going to fix that!
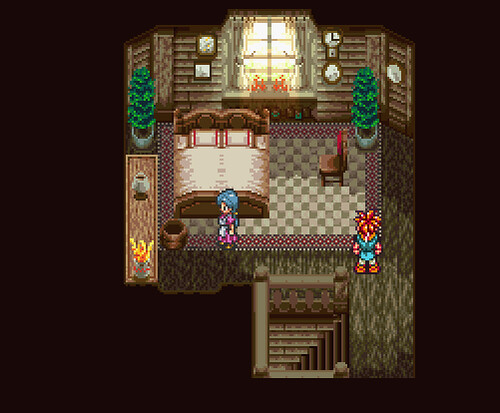
Dont mind the double bed- that was an experiment *cough*.
So, first things first, we need to extract the tileset to make our little hatch. Each tileset is made up of 7 graphic packs. To edit Laras rooms tileset we are going to decompress and extract each graphic pack of the tileset, but first, we need to find them.
We will go to Laras room, since this is the map we want to edit and not all of Luccas house shares the same tileset (mostly Luccas room and the main entryway share two separate graphics packs that are unique to their tileset).
So, we go to Laras room in Temporal Flux. On the lower lefthand side we see L ½ Tilsets 2. Remember this number.

Youll want to download my attachment CLGRH VOl I...insertion- and open the Chrono Trigger Background Graphics Info excel sheet. Open that, go to the first tab (if not already there) tileset composition. Then, in column A, look for the number 2.
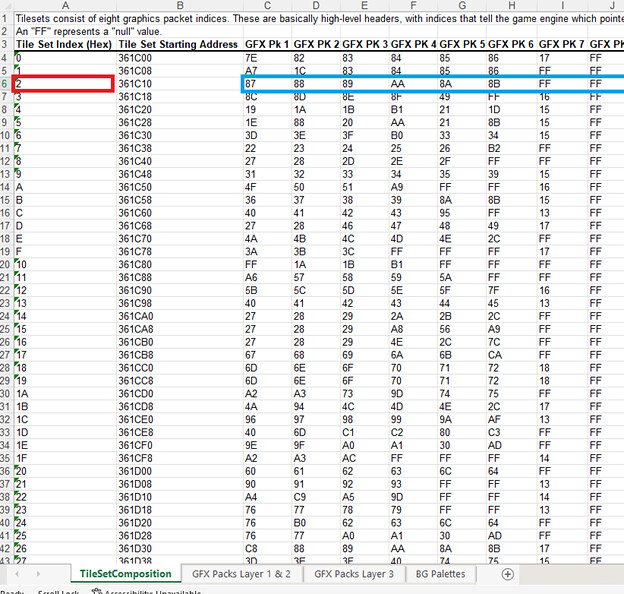
We find 2 under the tileset index, and look to the right to see the 7 Graphics packs addresses in Columns C-J with the addresses 87, 88, 89, AA, 8A, 8B.
A quick note: (Now, several tilesets in the game share graphics packs, so say, if we were replacing all 7 graphics packs with entirely new tiles, wed have to be mindful of what other maps would be effected. For example if we wanted to change all these packs into say a tileset for a beautiful beach, there would likely be no 600 AD or 1000 AD indoor tilesets.)
Now that we have our 7 tileset addresses you are wondering why I am not including the 8th graphics pack which is clearly listed in the excel sheet. To my knowledge its best to leave that one alone and pretend it doesnt exist- youll notice that every 8th graphics pack has the same address, FF. I believe (though correct me if Im wrong gurus) FF is an empty space not to be confused with a usable space. So that means graphic pack 7 is also a dud, its address is FF as well. So we have 6 packs to work with for adding our own tiles.
ANyhoo! So we take our 6; 87, 88, 89, AA, 8A, and 8B and we go to the next tab in the excel sheet GFX PACK layer 1 and 2.
We look for 87 in Column A and get our address in column 3.

Oh look how fortunate, its a 3 for 1!
So 87s address is 2B43A7, 88s 2B4FFA, and 89s is 2B5C53.
Do the same process to find AA, 8A, and 8Bs address.
Now we have
87---2B43A7 pack 1
88 ---2B4FFA pack 2
89---2B5C53 pack 3
AA---2CF61D pack 4
8A----2B67C7 pack 5
8B---2B733E pack 6
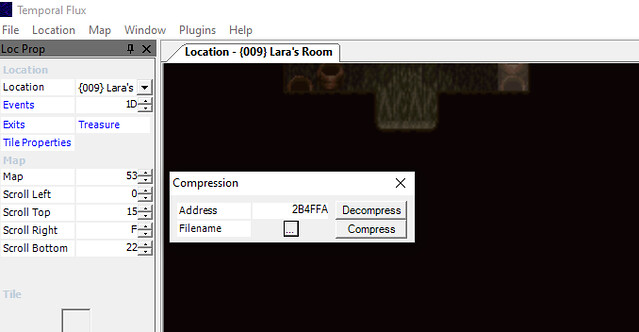
Now that we have our addresses its time to decompress and extract them! If you wanted to do a full tileset change, youd extract all 6. We are going to extract pack 2, 88--- 2B4FFA for the purpose of this tutorial.
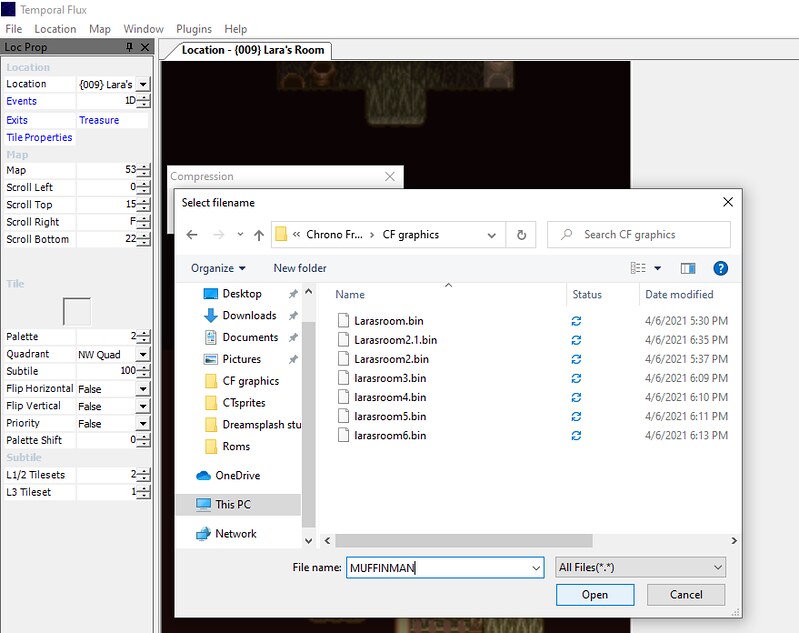
Go to Temporal flux and open up the rom (unheadered). Go to File > Compression

> 2B4FFA > hit the square with 3 dots > name this file something like indoor1 or whatever you fancy > hit open > then hit decompress. It will decompress to the area you chose with the name you chose. I named mine Muffinman. 😊

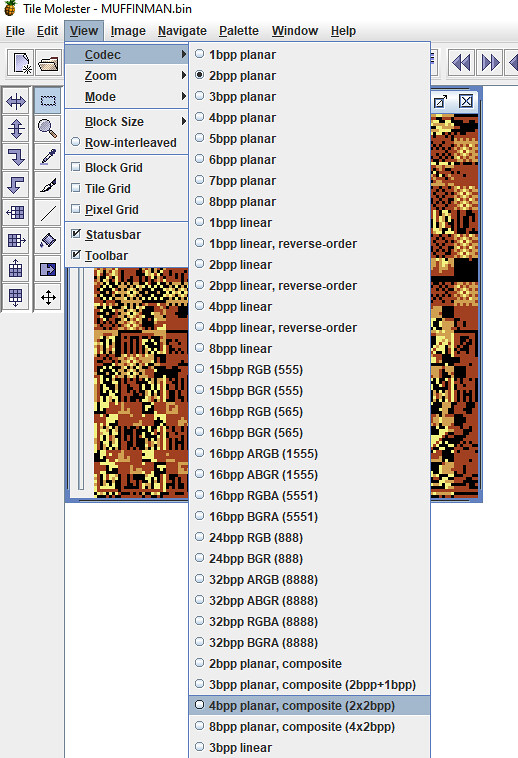
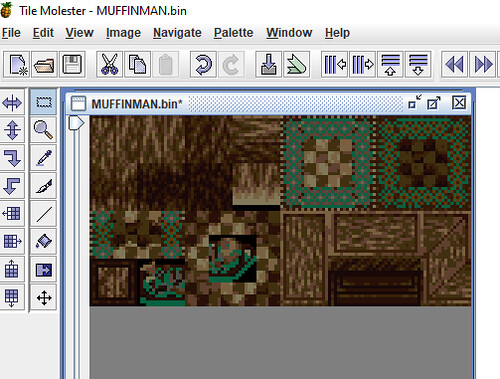
Now that we have extracted and decompressed our pack or packs, we can open them up in tilemolester make sure you have java installed and decide where we want to add our hatch.
Click file > open > (make sure you have Files of Type: All Files selected at the bottom) select what you named the decompressed file for pack 1 (2B4FFA). (mine was Muffinman).

Ahh, isnt she glorious? Lets help us see this better. Go to View, Codec 4bpp planar, composite (2x2 bpp).
 \
\
Vola!

Shes recognizable! We can see this is clearly some of the tiles in indoor homes, but the colors are all funky.
We will want to insert the palette so we can see what we are doing. To do that, open up the good old ZSNES or whatever emulator kids are using these days, load up a CT Rom, go to Laras room (or in any indoor map area but best to do Laras room since thats the room we want to change and like I said, some maps share tile sets or graphics packs and lack others) and make a save state while in Laras room.
Exit, go back to tilemolester, and hit Palette > Import from > Another File >
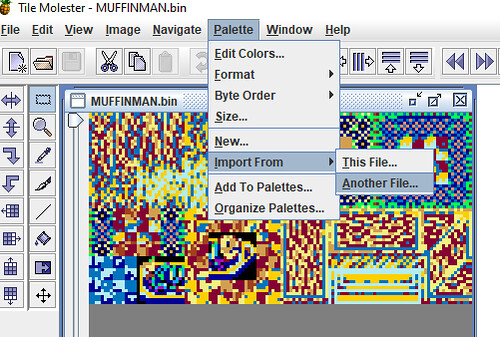
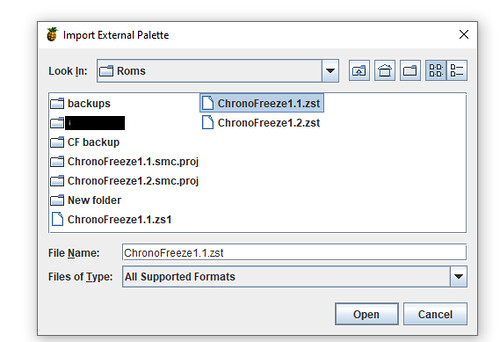
And click on the savestate you just made. If your using ZSNES the file is whatever your rom name is .zst or zs1 if you used savestate 1 instead of 0. Mine was called ChronoFreeze.1.1zst.
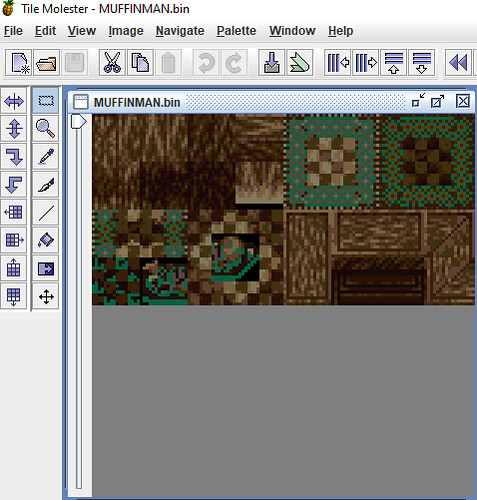
Load that sucker in and look at the bottom where theres several colors and arrows. It loaded all the palettes in so we will want to sort to the palette we want. Keep hitting the right arrow button until it looks right.

Eventually you should get this. Note that the palette is not completely accurate this is because different individual tiles in the pack have different palettes.
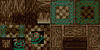
What I mean by that is -compare these two:

They are the same graphics pack with different palettes applied for the rug we want the palette displayed in the bottom image, but since we are making a hatch which resembles the floor, well stick with the first palette, the top image.
We snag that top image and take it to whatever editor we have. I tend to zoom out twice and print screen it and use Aseprite; you can use whatever image editor you like, even MS Paint in a pinch if you have nothing else.
We design our little hatch, and need to discern where it will go. It will have to replace something. We could have picked one of the other packs, which, may have had extra space, but Im here to tell you they didnt and this was our best option 😉.
I settled on replacing the bottom left carpet image circled in red. (I did this on the wrong example above, it should be the darker palette version).
We dont need it (to my knowledge) because the same image is also in the upper right corner dark beige and brown carpet squares. This MIGHT mean we might need to replace some carpets in the homes of our 1000 and 600 AD friends with the upper right tile instead of the tile we have replaced but its a sacrifice Im willing to make in the name of laziness.
So, we paste our hatch over that like so:
Beautiful!
Now to compress it and ship it back into the rom!
Youll want to save the edited graphics pack with your new tiles inserted - in this case the hatch -as the exact same size of the original image we print screened from tilemolester. So as close to the image of above we are constrained to the height and width of this. I made a blank template, should you want to create your own tilesets/need the exact size attached as GFXtemplate.
Save it as a png, wander back to tilemolester, and we are going to import it in.
The image above, I saved as png tutorial 17 and loaded it into tile molester over the original MUFFINMAN or whatever you named your original graphics pack 1.

There's our hatch! We save that either under the same name or, to be safe, maybe, Muffinman1 in case we made an error. We go back to Temporal Flux, Hit File > Compression > 2B4FFA> Compress
Save the Rom!
Now, you might think we are done and in this case, we almost are! Because we pasted the hatch over an image that already existed instead of free space, we dont need to teach Temporal Flux where it is! Its right here:

However, Its the wrong color so lets click on it and to the far left side youll see this image: \

Now we just shift the color from 4 to 5 like so and do it for all 4 quadrants. - NW, NE, SW, SE
Aaaand Vola we got a dark little hatch! We are going to replace it a little bit behind Laras chair.

Write to memory, save, and open up your emulator and run Crono out and back in since we saved him in this room and it wont acknowledge the changes yet.
There it be!

Now you can use the same methods to completely change entire tilesets, but, what I didnt teach you is that when you insert something new, youll need a new palette, and, sometimes, youll need to tell TF where something is. Attached is a better tutorial than I can give which includes creating an entire new tileset, and it teaches how to change the palettes and teach TF where new inserted graphics are. 😊
Happy hacking!
EDIT: I forgot to attach the right document, Mauron has been kind enough to link to the tools you need below! Thanks Mauron! You'll want to click Mauron's link and 'Adding a new tilset' which should give you CLGRH volume I and the graphics pack info excel sheet I used earlier in the tutorial.
And of course feel free to grab and explore all the other wonderful things there!
CLGRH Volume I will help with changing palette information and teaching TF where new graphics are that you inserted. It is the guide that helped me write this one and is vastly superior, I just dumbed it down - mostly for myself
***You'll also want to be mindful that when you compress your edited tileset back into the rom, if it exceeds a certain address you'll need to repointer.
For example when I decompress our 2nd graphics pack address 2B4FAA a at the bottom it tells us:

that it ranges from 2B4FAA to 2B5C2C - and (correct me if im wrong Mauron) as long as you don't exceed 2B5C2C you wont need to repointer.
Attached are two templates I use for tile insertion and an older guide that was on the compendium made by wonderful people with tools I use in this guide. Enjoy!
---------------------------------------------------
So you want to add something to an existing tileset (or- replace an existing tileset with your own art) This tutorial is for you!
For the purpose of this tutorial we will be adding a small hatch door into Laras room in CT from Chrono Cross:
Right there behind the chair. So currently, that doesnt exist but we are going to fix that!
Dont mind the double bed- that was an experiment *cough*.
So, first things first, we need to extract the tileset to make our little hatch. Each tileset is made up of 7 graphic packs. To edit Laras rooms tileset we are going to decompress and extract each graphic pack of the tileset, but first, we need to find them.
We will go to Laras room, since this is the map we want to edit and not all of Luccas house shares the same tileset (mostly Luccas room and the main entryway share two separate graphics packs that are unique to their tileset).
So, we go to Laras room in Temporal Flux. On the lower lefthand side we see L ½ Tilsets 2. Remember this number.
Youll want to download my attachment CLGRH VOl I...insertion- and open the Chrono Trigger Background Graphics Info excel sheet. Open that, go to the first tab (if not already there) tileset composition. Then, in column A, look for the number 2.
We find 2 under the tileset index, and look to the right to see the 7 Graphics packs addresses in Columns C-J with the addresses 87, 88, 89, AA, 8A, 8B.
A quick note: (Now, several tilesets in the game share graphics packs, so say, if we were replacing all 7 graphics packs with entirely new tiles, wed have to be mindful of what other maps would be effected. For example if we wanted to change all these packs into say a tileset for a beautiful beach, there would likely be no 600 AD or 1000 AD indoor tilesets.)
Now that we have our 7 tileset addresses you are wondering why I am not including the 8th graphics pack which is clearly listed in the excel sheet. To my knowledge its best to leave that one alone and pretend it doesnt exist- youll notice that every 8th graphics pack has the same address, FF. I believe (though correct me if Im wrong gurus) FF is an empty space not to be confused with a usable space. So that means graphic pack 7 is also a dud, its address is FF as well. So we have 6 packs to work with for adding our own tiles.
ANyhoo! So we take our 6; 87, 88, 89, AA, 8A, and 8B and we go to the next tab in the excel sheet GFX PACK layer 1 and 2.
We look for 87 in Column A and get our address in column 3.
Oh look how fortunate, its a 3 for 1!
So 87s address is 2B43A7, 88s 2B4FFA, and 89s is 2B5C53.
Do the same process to find AA, 8A, and 8Bs address.
Now we have
87---2B43A7 pack 1
88 ---2B4FFA pack 2
89---2B5C53 pack 3
AA---2CF61D pack 4
8A----2B67C7 pack 5
8B---2B733E pack 6
Now that we have our addresses its time to decompress and extract them! If you wanted to do a full tileset change, youd extract all 6. We are going to extract pack 2, 88--- 2B4FFA for the purpose of this tutorial.
Go to Temporal flux and open up the rom (unheadered). Go to File > Compression
> 2B4FFA > hit the square with 3 dots > name this file something like indoor1 or whatever you fancy > hit open > then hit decompress. It will decompress to the area you chose with the name you chose. I named mine Muffinman. 😊
Now that we have extracted and decompressed our pack or packs, we can open them up in tilemolester make sure you have java installed and decide where we want to add our hatch.
Click file > open > (make sure you have Files of Type: All Files selected at the bottom) select what you named the decompressed file for pack 1 (2B4FFA). (mine was Muffinman).
Ahh, isnt she glorious? Lets help us see this better. Go to View, Codec 4bpp planar, composite (2x2 bpp).
\Vola!
Shes recognizable! We can see this is clearly some of the tiles in indoor homes, but the colors are all funky.
We will want to insert the palette so we can see what we are doing. To do that, open up the good old ZSNES or whatever emulator kids are using these days, load up a CT Rom, go to Laras room (or in any indoor map area but best to do Laras room since thats the room we want to change and like I said, some maps share tile sets or graphics packs and lack others) and make a save state while in Laras room.
Exit, go back to tilemolester, and hit Palette > Import from > Another File >
And click on the savestate you just made. If your using ZSNES the file is whatever your rom name is .zst or zs1 if you used savestate 1 instead of 0. Mine was called ChronoFreeze.1.1zst.
Load that sucker in and look at the bottom where theres several colors and arrows. It loaded all the palettes in so we will want to sort to the palette we want. Keep hitting the right arrow button until it looks right.
Eventually you should get this. Note that the palette is not completely accurate this is because different individual tiles in the pack have different palettes.
What I mean by that is -compare these two:
They are the same graphics pack with different palettes applied for the rug we want the palette displayed in the bottom image, but since we are making a hatch which resembles the floor, well stick with the first palette, the top image.
We snag that top image and take it to whatever editor we have. I tend to zoom out twice and print screen it and use Aseprite; you can use whatever image editor you like, even MS Paint in a pinch if you have nothing else.
We design our little hatch, and need to discern where it will go. It will have to replace something. We could have picked one of the other packs, which, may have had extra space, but Im here to tell you they didnt and this was our best option 😉.
I settled on replacing the bottom left carpet image circled in red. (I did this on the wrong example above, it should be the darker palette version).
We dont need it (to my knowledge) because the same image is also in the upper right corner dark beige and brown carpet squares. This MIGHT mean we might need to replace some carpets in the homes of our 1000 and 600 AD friends with the upper right tile instead of the tile we have replaced but its a sacrifice Im willing to make in the name of laziness.
So, we paste our hatch over that like so:
Beautiful!
Now to compress it and ship it back into the rom!
Youll want to save the edited graphics pack with your new tiles inserted - in this case the hatch -as the exact same size of the original image we print screened from tilemolester. So as close to the image of above we are constrained to the height and width of this. I made a blank template, should you want to create your own tilesets/need the exact size attached as GFXtemplate.
Save it as a png, wander back to tilemolester, and we are going to import it in.
The image above, I saved as png tutorial 17 and loaded it into tile molester over the original MUFFINMAN or whatever you named your original graphics pack 1.
There's our hatch! We save that either under the same name or, to be safe, maybe, Muffinman1 in case we made an error. We go back to Temporal Flux, Hit File > Compression > 2B4FFA> Compress
Save the Rom!
Now, you might think we are done and in this case, we almost are! Because we pasted the hatch over an image that already existed instead of free space, we dont need to teach Temporal Flux where it is! Its right here:
However, Its the wrong color so lets click on it and to the far left side youll see this image: \
Now we just shift the color from 4 to 5 like so and do it for all 4 quadrants. - NW, NE, SW, SE
Aaaand Vola we got a dark little hatch! We are going to replace it a little bit behind Laras chair.
Write to memory, save, and open up your emulator and run Crono out and back in since we saved him in this room and it wont acknowledge the changes yet.
There it be!
Now you can use the same methods to completely change entire tilesets, but, what I didnt teach you is that when you insert something new, youll need a new palette, and, sometimes, youll need to tell TF where something is. Attached is a better tutorial than I can give which includes creating an entire new tileset, and it teaches how to change the palettes and teach TF where new inserted graphics are. 😊
Happy hacking!
EDIT: I forgot to attach the right document, Mauron has been kind enough to link to the tools you need below! Thanks Mauron! You'll want to click Mauron's link and 'Adding a new tilset' which should give you CLGRH volume I and the graphics pack info excel sheet I used earlier in the tutorial.
And of course feel free to grab and explore all the other wonderful things there!
CLGRH Volume I will help with changing palette information and teaching TF where new graphics are that you inserted. It is the guide that helped me write this one
***You'll also want to be mindful that when you compress your edited tileset back into the rom, if it exceeds a certain address you'll need to repointer.
For example when I decompress our 2nd graphics pack address 2B4FAA a at the bottom it tells us:
that it ranges from 2B4FAA to 2B5C2C - and (correct me if im wrong Mauron) as long as you don't exceed 2B5C2C you wont need to repointer.
3
Chrono Trigger Modification / No Helmet Lucca Patch
« on: September 20, 2021, 09:52:55 pm »

Howdy ho! I've been writing a tutorial for PC sprite insertion and used an old design I had from a dream splash circa 2017-2018. Anyway, this is my first successful PC sprite insertion and I'm looking for beta testers to test Lucca out. If you're bored, give her a go and report any bugs here! Or you know, just have fun with a slightly different looking Lucca in your game!
(Attach .ips to an unheadered CT Rom).
Feel free to use her, just credit me
Expect PC sprite insertion tutorial in kajar labs eveeeentuaaalllyyyyy.
And the entire compendium weeped because i just gave Lucca new clothes and didn't put Schala in.
4
News Submissions / Not mine, but had to share - guitar cover corridors of time
« on: July 15, 2021, 07:53:40 am »
If there is a thread to share things we found - sorry for this! Found this before work and fell in love with it:
https://www.youtube.com/watch?v=Yb0to3ok8FQ
https://www.youtube.com/watch?v=Yb0to3ok8FQ
5
News Submissions / Chrono Trigger 25TH ANNIVERSARY Review and Retrospective SNES - video
« on: July 25, 2020, 01:27:06 pm »
https://youtu.be/nTFprLPJ02U
Hope this is the right place to post something like this. Found this video while falling down the youtube rabbit hole and learned some things I never knew about gold old CT! I'd actually like to fact check some of it.
Some of what the video states contradicts what I thought I knew about Chrono Trigger's history, so if any of you guys know your CT history, is this legit?
For example it says Chrono Trigger was originally going to be part of the Secret of Mana saga and called Maru Island, and there is some very interesting early sketch work for the cast, specifically Frog.
What do you all think?
6
Chrono Trigger Modification / Overworld Palette question
« on: February 13, 2020, 07:51:36 pm »
So I'm brewing something small for that potential hacking event/competition https://www.chronocompendium.com/Forums/index.php?topic=13230.0 and I stumbled into a few roadblocks.
roadblock one is simple, I just want to entirely dispose of the boat in the overworld for 1000 A.D. Should be pretty simple but I opened the events for 1000 AD to delete it and couldn't tell the boat from probably important things I need >.>
Roadblock number 2 is about palettes. I know that at least 1000 AD, 600 AD, and the dark ages share some of the same graphics packs for its overworld sprites. (L 1/2 Tileset 0, 1, 2, and 3) - actually I think 1000 AD and 600 AD share 100 percent of the same graphics. Anyway, I know i can shift the palettes around with the L 1/2 Palette option, number 4 is 1000 AD's colors and 5 is 600 AD, changing a bright happy world to a more dark middle aged world.
What I wanted to know is how can I change where the palette is pulled from?
When I edit NPCS i change the palette of the graphics pack with Snespal, but as these overworld sprites share graphics packs and have different palettes assigned, I'm trying to figure out where say, the dark ages palette is assigned and what address I could edit it at in snespal or something to that affect?
I hope that makes sense xD
7
Chrono Trigger Modification / Explain to me as if I were five...
« on: January 30, 2019, 05:00:48 pm »
How I would go about giving a monster new abilities. For example say I'd like to give reptites the ability to do fire magic. If there's already a guide to this I missed it.
8
Dream Splash VI - Dream of Zeal [2018] / The Rise of Zeal [2D Art]
« on: July 30, 2018, 07:00:40 pm »
This was supposed to actually be a very small rom hack but It got too ambitious and I ran out of time, so instead, here are the graphics I had mostly finished for that project.
The idea was based after the Fall of Guardia, we the player would control Lucca. In the first chapter we would be able to explore the Porre dominated Zenan and Lucca would have her falling out with Lynx and end up in the kingdom of Zeal, pre its rise. It would have a young king and queen Zeal and perhaps a baby Schala. The kingdom would still be in the sea and frozen before it rose.

I actually even began some minor editing in TF for 1000 A.D.
But that's all that's been inserted just a broken Guardia castle, broken down Truce, and a less balloon filled Leene Square.
The plot was going to go with somehow Lucca messes things up, and when Zeal does rise, it never falls like it is supposed to, which messes up the time stream.
This resulted in a teenage Janus and an alternate teenage Schala:

Though honestly, I think I just wanted to see a Kid like Schala and a teen Magus.
I also did some edits to Lucca's sprite, to match how she looked in the cut scene when she finds Kid at the end of the playstation version. Though I didn't get a chance to finish it yet.
Yep! I might one day actually make something of this, but I think I'd much prefer to work on a team so if anyone needs a spriter for a rom hack, here I am
The idea was based after the Fall of Guardia, we the player would control Lucca. In the first chapter we would be able to explore the Porre dominated Zenan and Lucca would have her falling out with Lynx and end up in the kingdom of Zeal, pre its rise. It would have a young king and queen Zeal and perhaps a baby Schala. The kingdom would still be in the sea and frozen before it rose.
I actually even began some minor editing in TF for 1000 A.D.
But that's all that's been inserted just a broken Guardia castle, broken down Truce, and a less balloon filled Leene Square.
The plot was going to go with somehow Lucca messes things up, and when Zeal does rise, it never falls like it is supposed to, which messes up the time stream.
This resulted in a teenage Janus and an alternate teenage Schala:
Though honestly, I think I just wanted to see a Kid like Schala and a teen Magus.
I also did some edits to Lucca's sprite, to match how she looked in the cut scene when she finds Kid at the end of the playstation version. Though I didn't get a chance to finish it yet.
Yep! I might one day actually make something of this, but I think I'd much prefer to work on a team so if anyone needs a spriter for a rom hack, here I am
9
Chrono Trigger Modification / How do I...?
« on: June 04, 2018, 12:59:08 am »
Just some general TF questions I couldn't figure out on my own or through the guides/tutorials/Modification's page/ scouring the forums.
1. Where would I locate the sprites for the time period display in the lower left corner? Say if I wanted to change 600 AD to 605AD for example? I couldn't find it in the CT unheadered sprite info excel document.
2. How do I rename an exit? For example, if I wanted Leene's Square to change to Nadia's Square when walking over to it on the overworld.
Thanks
10
Chrono / Gameplay Casual Discussion / Chrono Trigger Android differences
« on: March 27, 2017, 12:14:54 pm »
Finally bought myself CT on the android and I noticed a few differences the Android has that the DS version and older versions do not. The first being its definitely a different translation from Woolsey's and the DS. Different font too. Also Crono has a different overworld sprite. Did we know this?
(left all versions besides Android, right, android).
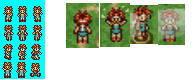
Im not every far in the game so i'll look for more differences along the way. I'll also try to get those overworld sprites. I'm assuming its not only Crono who's had a change.
(left all versions besides Android, right, android).
Im not every far in the game so i'll look for more differences along the way. I'll also try to get those overworld sprites. I'm assuming its not only Crono who's had a change.
11
Submissions / A brief history of Chrono Trigger
« on: November 12, 2016, 11:28:53 pm »
Not mine but I was excited to see Chrono Trigger on the Game theorists . THE DREAM OF ZEAL IS ALIVE!? legit though, Square what are you dooooing.
A brief history of CT: https://www.youtube.com/watch?v=Vf4B5Ab_S00
Also much older, Chrono is god: https://www.youtube.com/watch?v=x-Sp62q2FAY
A brief history of CT: https://www.youtube.com/watch?v=Vf4B5Ab_S00
Also much older, Chrono is god: https://www.youtube.com/watch?v=x-Sp62q2FAY
12
Chrono Trigger Modification / Chrono Trigger Lavos Awakening
« on: May 31, 2016, 03:44:38 pm »
I stumbled upon this site looking for Chrono Trigger art. Just curious if anyone's tried this out?/if its any of us who made it?
Chrono Trigger lavos awakening:
http://www.insanedifficulty.com/board/index.php?/forum/130-chrono-trigger-lavos-awakening/
http://www.insanedifficulty.com/board/index.php?/topic/3043-chrono-trigger-hardtype-download-and-description/
Chrono Trigger lavos awakening:
http://www.insanedifficulty.com/board/index.php?/forum/130-chrono-trigger-lavos-awakening/
http://www.insanedifficulty.com/board/index.php?/topic/3043-chrono-trigger-hardtype-download-and-description/
13
Characters, Plot, and Themes / Secret Robo FMV ending (playstation&DS versions)
« on: March 29, 2016, 02:58:59 am »
https://www.youtube.com/watch?v=eyUQjgtmMEc 4:37 in. Robo is the only one with a secret FMV ending?  Is this true? Is this listed on the Compendium somewhere? I don't recall ever seeing this ending or hearing about it and it's not listed here. https://www.chronocompendium.com/Term/Endings_(Chrono_Trigger).html
I don't believe he's talking about this either: https://www.youtube.com/watch?v=1Sr9bmSjTt8
As it doesn't show Robo at all.
Edit: Or is he saying Robo is the only one without an FMV ending? Robo and Magus are the only ones not shown in the video I just linked? I can't quite make out if he's saying with or without and the youtube captions option did not help.
14
Fan Art / Gaspar sprites
« on: December 04, 2014, 02:32:23 pm »
Back in 2011 I helped sprite a playable Gaspar for a rom hack. Whelp the sprites are no longer needed so I think it's safe to go more public with them than I already have!

He's basically a clone of Crono (because i know 0 percent about sprite insertion and assembly and I thought it'd be easier if he could replace Crono as easily as possible)
It was made in 2011 and I can spot like A MILLION mistakes with it now buuut I still think its worth sharing! - Vola
You all may use him whenever however you wish! Please credit me <3
15
Chrono Trigger Modification / How to...(Temporal Flux)
« on: November 27, 2014, 01:18:32 pm »
Thanks to some hacking work being allowed again I've dug this out of the depths of my computer where my true pack rat like nature has no bounds:
Old little tips from the Compendium on how to code certain things via Temporal Flux
-------------------------------------------------------------------------------
Title: How To.........
Post by: Agent 12 on January 02, 2006, 06:19:21 pm
--------------------------------------------------------------------------------
In an effort to help people code in TF
Make A Chest:
1. Place on Map, Place Open Chest off map
2. Make an Object and set Coordinates on the chest
3. Pseudo Code that Object
startup/idle:
set Object Coord //at chest area
if(MemorySpotOfChest && Bit)
---Copy Tiles from open chest on map
---remove this object
Activate:
ExploreMode Off
Copy Tiles as before
7f0200==Index of Item
"you got {item}"
BitMath(MemorySpotOfChest, Bit, Set)
RemoveObject
ExploreMode On
Note1: Every Memory Spot of Chest has 8 (right???) bits you can set to either true of false, thus every Memory Spot can be used for 8 chests.
Note2: 7f0200 is the Memory spot used when you put {item} in a string. You set 7f0200 to the number of the item you'll be receiving then by sayihng "you got {item}" it'll display you got Wood Sword (for example)
Do A Battle
This Code can be activated either by stepping on a spot (placing an object at the spot and making it's arb. 0 this code) or by touching an enemy (Making the enemies arb. 0 this code)
Arbitrary 0
ExploreModeOff
Move Party //move party to correct tiles
Move Sprite //if this is not the enemies arb do a callObjectFunction
Scroll Screen //params are upper left corner tile (x,y)
Battle
//if this is a random encounter (not touching enemy)
Remove (object)
ExploreModeOn
If anyone notices a mistake I made or has questions please feel free to post and I'll update. Also any more complicated stuff that people might have trouble coding?
--jp
--------------------------------------------------------------------------------
Title: How To.........
Post by: Chrono'99 on January 03, 2006, 08:37:26 pm
--------------------------------------------------------------------------------
Thanks for the tips
Also could you explain how you (or someone else) changed the CT intro to the CT:CE intro? I'm trying to change some stuff in the Title Screen but the screen just keep on looping back to the start instead of going to the new game/continue menu.
--------------------------------------------------------------------------------
Title: How To.........
Post by: Agent 12 on January 03, 2006, 10:14:32 pm
--------------------------------------------------------------------------------
Change the Title Screen
Thank DDK for the new opening sequence
1. Open up Location {1b1} Title Screen.
2. Object 1 Arbitrary 1 has a "change Location at the end"
3. Change that Location to the location that you will have your new Title screen be
4. In the events of your new location make some sort of small intro, make sure at the end of the intro you have a change location {000} Load Screen
Obtain the Epoch
The first time you add the epoch to the game you will have to Do some memory commands in some arbitrary in your code and call that arbitrary.
Assign(Mem.7E0290=Pixel) //XCoord on Map
Assign(Mem.7E0292=Pixel) //YCoord on Map
Assign(Mem.7E029F=MapNumber)//Map LOCATION number 1FX
Assign(Mem.7E0294=XX)// A0 for wings 00 for no wings
Note: After some debugging it was found that the pixels for the X and Y coordinates should end in 0 and be far away from exits. Also make the width to two bytes for all assignments except the 7E0294.
--jp
--------------------------------------------------------------------------------
Title: How To.........
Post by: mintman on January 06, 2006, 01:32:36 am
--------------------------------------------------------------------------------
Hey, I'm wondering if you've been successful in getting Crono to lay in a bed correctly - that is, without all the layers screwing up. I keep copying the code and tile properties from the original scene in the opening, but it doesn't work: Crono ends up above some layers and below others.
Thanks in advance!
--------------------------------------------------------------------------------
Title: How To.........
Post by: Agent 12 on January 06, 2006, 02:42:09 am
--------------------------------------------------------------------------------
Make a bed
1) Draw the bed
2)when you want your character to go to sleep you call an arbitrary
3) In the arbitrary you
--set the coordinates (guess and check)
--set animation to 28 (I believe)
4)if you are having some tiles go over the sprite you
--select the tile
--On the locations tab you should see tile properties
--select which quadrant y ou no longer want to be over the sprites head (NW, NE, SW, SE)
--change priority to false
--jp
--------------------------------------------------------------------------------
Title: How To.........
Post by: JLukas on January 06, 2006, 09:50:30 am
--------------------------------------------------------------------------------
Check the code in the 1000 AD Porre Inn, it's a very bare-bones event with a great code example.
--------------------------------------------------------------------------------
Title: How To.........
Post by: CyberSarkany on January 07, 2006, 08:53:23 pm
--------------------------------------------------------------------------------
This is the first of many stupid questions that will come:
I'm trying the tutorial stuff at the Elter's house in medina(with the shipman), at the point where to script them(Dialogue)
["In Temporal Flux 1.7, go to Dialogue (0x384650) in Strings (if 2.0 is out by the time you read this, you can just paste these as you make textbox commands). Replace lines 00-07 with the following:"].
I found out(after a few mins) there is no dialogue part in strings anymore, so i tried this:
new object->Startup/idle:new command-> text; Textbox; BB; bottom; no; 0; 0; 0;(in the empty box the text at the tutorial copy'n'pasted).
Well, i bet i made something wrong, because when i enter the house now, a black screen appears, but the music still plays.
Shouldn't this be in a new object? Where does it have to be then?
Or do I've to finish the tutorial first(wasn't sure if the object stuff was right, that's why i asked before doing everything else wrong).
This was Nr.1, more will follow...
Sry again.
--------------------------------------------------------------------------------
Title: How To.........
Post by: Agent 12 on January 08, 2006, 12:45:35 am
--------------------------------------------------------------------------------
Add Text
TF 2.0 has a nifty new way to do text. I'll do two ways, having text randomly appear and having an NPC talk
----NPC Talk
1) Make an Object for your NPC. Following all rules of Objects (Make sure startup Idles last two commands are return, end)
2) Under this objects Arbitrary 0 put a return command
3) Under this objects Activate put this command Text->TextBox->string (you write the string)
4) put a return command
---Random Text
1) Follow steps 3 and 4 from before in some existing Arbitrary
2) Make an empty Object (put return and end in startup/idle)
3) Before the return in the startup Idle do a Call object function and call the arbitrary that you made in step 1.
Note: You cannot display Text in startup/Idle, you have to do a Call Object Function.
Note: If you are calling a function from Startup/Idle you have to call the Function from an object AFTER the object where you are calling the text from (I.E. Text is in object 7, call from object Cool
--------------------------------------------------------------------------------
Title: How To.........
Post by: Chrono'99 on January 08, 2006, 05:42:33 am
--------------------------------------------------------------------------------
Quote from: jsondag2
Note: If you are calling a function from Startup/Idle you have to call the Function from an object AFTER the object where you are calling the text from (I.E. Text is in object 7, call from object Cool
Wow, I think I had many problems because of this detail... Thanks for the information.
--------------------------------------------------------------------------------
Title: How To.........
Post by: ZeaLitY on January 08, 2006, 10:35:06 am
--------------------------------------------------------------------------------
That Zurvan Surfer looks good on you, Chrono'99.
--------------------------------------------------------------------------------
Title: How To.........
Post by: CyberSarkany on January 08, 2006, 01:36:07 pm
--------------------------------------------------------------------------------
Thx for nr.1, here a few others(still stupid):
2:is there any list of animations with pictures and stuff( like imp animation 05 and a picture of this animation, so people don't ve to test all these animation to c which is which...
3:I followed the tutorial now, but the elder is always saying the same phrase instead of the text I insert at the shipguys part. There is still the animation and the guy leaving/elder going to window, but the only thing whichis said is the phrase i declared in his activity. If i write to mem, save and reopen it, all phrases(from elder and shipguy) are the 1 the elder has to say later, donno why :/
Bah, i hate my english, hope you got what my problem is...
--------------------------------------------------------------------------------
Title: How To.........
Post by: Agent 12 on January 08, 2006, 02:34:38 pm
--------------------------------------------------------------------------------
Chrono 99'-Believe me I know how you feel took me forever to figure that out.
Cyber
2. Check out the animation thread sticky in Kajar. And a thread I made called "leave your mark in Chrono Mod history" Animation documentation is desparately needed.
3. There's a number that you want to keep incrementing called index if I remember correctly. Increment it till it's blank and then write your string in that box then click update then click write to memory. Hopefully that solves your problem.
Keep the questions coming.
--jp
--------------------------------------------------------------------------------
Title: How To.........
Post by: Chrono'99 on January 08, 2006, 05:24:43 pm
--------------------------------------------------------------------------------
Quote from: ZeaLitY
That Zurvan Surfer looks good on you, Chrono'99.
Thanks. I made my new signature without thinking about the rank icon, but they blend together well now.
Also thank you jsondag2. With all that help I might try to actually make some small hack or mod maybe...
--------------------------------------------------------------------------------
Title: Doing Battle
Post by: MoonStoner on January 08, 2006, 09:28:34 pm
--------------------------------------------------------------------------------
Thanks for the help with creating battles with TF, jsondag2, but when I try putting this code in a new enemy object in the Gato Exhibit event code, the battle box comes up but doesn't do anything (there's no enemy name in the box either). Also, the enemy's sprite is fine when I first enter the area, but when Crono moves, the enemy sprite is replaced with Crono's walking sprite (with messed up colors). This happens with any enemy sprite I try, even Gato's.
Is there anything I'm missing that would cause this?
Any help would be greatly appreciated.
-MoonStoner
P.S. I kept Gato and all his code intact when trying this.
--------------------------------------------------------------------------------
Title: How To.........
Post by: Agent 12 on January 08, 2006, 09:40:46 pm
--------------------------------------------------------------------------------
Sounds like an enemy PRM problem.
Enemy PRM's are very annoying once you have more than one enemy on the screen but for now make sure that whenever you call "LoadEnemy(XXXX)" the enemy PRM is between 3 and...I think A.
Though if you kept Gato's code intact I would have thought the enemy PRM was already correct...but check anyways and then post your results.
--jp
--------------------------------------------------------------------------------
Title: How To.........
Post by: kennyj2003 on January 08, 2006, 09:55:46 pm
--------------------------------------------------------------------------------
Yeah Im having a litle problem too, Im doing kinda the same thing but a lil diffrent. Im trying to put Schalas sprite in place of Gato and I succeed and her animations work when I engage her but she stays frozen in the outreached arms stance and doesn't move or anything, BTW I have Zeal final form moveset for her. Any tips?
--------------------------------------------------------------------------------
Title: How To.........
Post by: MoonStoner on January 08, 2006, 10:03:46 pm
--------------------------------------------------------------------------------
Thanks for the help! I changed the enemy PRM to 3 and everything seems to work great.
BTW, what is the PRM parameter do, exactly?
Thanks again,
-MoonStoner
--------------------------------------------------------------------------------
Title: How To.........
Post by: JLukas on January 08, 2006, 11:24:54 pm
--------------------------------------------------------------------------------
Quote from: kennyj2003
Yeah Im having a litle problem too, Im doing kinda the same thing but a lil diffrent. Im trying to put Schalas sprite in place of Gato and I succeed and her animations work when I engage her but she stays frozen in the outreached arms stance and doesn't move or anything, BTW I have Zeal final form moveset for her. Any tips?
Chickenlump (Zeal Battle author) will know more about this one, but the problem is likely because that Schala only has a few basic animations, not the entire set that monsters have.
Quote
BTW, what is the PRM parameter do, exactly?
This one is still sort of unknown. One of the bits, along with one of the flags in the Battle command setting determines if the enemy disappears after being killed. If you wanted, you could make Gato die and disappear like a regular enemy. The other bits appear to have something to do with what order the enemies are in when the battle starts (ex: the enemy names list)
--------------------------------------------------------------------------------
Title: How To.........
Post by: Agent 12 on January 09, 2006, 02:51:26 am
--------------------------------------------------------------------------------
Kenny: Yup JLukas Nailed it on the head there
Moon:
I even learned a bit from JLukas post there. All I know is
1) Between 3-A (A may be wrong)
2) When you have 2 of the same enemy it helps if the PRM is farther apart
3) Instead of guess and checking it's easier to just look for examples of how to have more than one enemy (For Example I tried like 10 combinations to do zeal and her hands before I finally just checked the real fight, same with dragon Tank)
--------------------------------------------------------------------------------
Title: How To.........
Post by: MoonStoner on January 09, 2006, 03:43:38 am
--------------------------------------------------------------------------------
Thanks for all the help guys!
I'm starting to really enjoy working with TF. At first I got frustrated with all the details, but a few short examples by the more expirienced users has shown me what a jewl this program actually is. Keep up the excellent work JLukas, Geiger, and Chickenlump!
Time to get to work on some new sidequests. A "finding Schala" quest seems interesting enough. Maybe one day it'll be possible to have her join the team...
-MoonStoner
--------------------------------------------------------------------------------
Title: How To.........
Post by: kennyj2003 on January 09, 2006, 04:33:33 am
--------------------------------------------------------------------------------
Sorry I gotta be persistant but is there anyway for her to function normally in any battle scene with that A.I. pointer?
--------------------------------------------------------------------------------
Title: How To.........
Post by: justin3009 on January 09, 2006, 09:07:37 am
--------------------------------------------------------------------------------
Well, I had the enemy AI pointer where the enemy walks around and stuff. I just have to find it again :\. I'll post it here once i find it
31655 moves around and attacks but this is taken from Gato's AI. So if you want them 2 use gato's moves use that. But i'll try to find another one where they just walk around and hit.
Another update . 34523 this one runs towards the hero and attacks.
--------------------------------------------------------------------------------
Title: How To.........
Post by: ZeaLitY on January 09, 2006, 10:27:23 am
--------------------------------------------------------------------------------
Good luck, MoonStoner. It's good to see someone break past the initial troubles of learning events so deftly!
--------------------------------------------------------------------------------
Title: How To.........
Post by: Chickenlump on January 09, 2006, 01:13:12 pm
--------------------------------------------------------------------------------
Quote from: kennyj2003
Sorry I gotta be persistant but is there anyway for her to function normally in any battle scene with that A.I. pointer?
It wasn't until recently that I found out that Chrono Tweaker wasn't saving AI pointers correctly (nobody noticed, and nobody let me know). It can still be done through a hex editor, changing her pointer manually, looking at Geiger's offsets listing or that pointer list I made awhile back. Try other AI if you like, some enemies require other enemies to be active, or on screen, or other variables to be set, as part of their AI. Also, like Jlukas has mentioned, the game, or the monster's AI, or a certain enemy tech will call for enemy animation number 18, while Schala (or whoever) only has up to animation number 8 (completely made up numbers, but it gets the point across).
This is part of why Zeal Battle hasn't gotten an upgrade in awhile.
There are other ways to make a better Schala for battle, but it would involve being creative, and other hard work. I am impressed you have come as far as you have though, your improvement in general is very impressive.
--------------------------------------------------------------------------------
Title: How To.........
Post by: ZeaLitY on January 09, 2006, 01:51:15 pm
--------------------------------------------------------------------------------
Aha...I should have told you earlier. I tried replacing a Frog with something else, and noticed the changes weren't saving. Never e-mailed you though
--------------------------------------------------------------------------------
Title: How To.........
Post by: Chickenlump on January 09, 2006, 02:11:56 pm
--------------------------------------------------------------------------------
It's ok, I plan on updating it one of these days.
--------------------------------------------------------------------------------
Title: How To.........
Post by: kennyj2003 on January 09, 2006, 08:55:25 pm
--------------------------------------------------------------------------------
Quote from: Chickenlump
Quote from: kennyj2003
Sorry I gotta be persistant but is there anyway for her to function normally in any battle scene with that A.I. pointer?
It wasn't until recently that I found out that Chrono Tweaker wasn't saving AI pointers correctly (nobody noticed, and nobody let me know). It can still be done through a hex editor, changing her pointer manually, looking at Geiger's offsets listing or that pointer list I made awhile back. Try other AI if you like, some enemies require other enemies to be active, or on screen, or other variables to be set, as part of their AI. Also, like Jlukas has mentioned, the game, or the monster's AI, or a certain enemy tech will call for enemy animation number 18, while Schala (or whoever) only has up to animation number 8 (completely made up numbers, but it gets the point across).
This is part of why Zeal Battle hasn't gotten an upgrade in awhile.
There are other ways to make a better Schala for battle, but it would involve being creative, and other hard work. I am impressed you have come as far as you have though, your improvement in general is very impressive.
Thanx Ive been really trying alot on TP through trial and error and I gotta say its hard sometimes when you try 50 diffrent things and they don't work. For instance I got her to walk around as the enemy, using the Hetake pointer, and she jumps and attacks but thats pretty much all she does.I read somewhere that Magus's second form A.I. pointer works with her normally but I can't seem to get it to work. Which A.I. pointer did you use for the Zeal Battle(which was very cool, my inspiration)?
--------------------------------------------------------------------------------
Title: How To.........
Post by: Chickenlump on January 10, 2006, 12:26:14 am
--------------------------------------------------------------------------------
I don't for the life of me remember whose AI I used.
I REALLY REALLY REALLY wanted final Spekkio's AI... *evil laugh*
I didn't know Crono Tweaker was borked in that area at the time, which explains why I didn't end up using his/her/it's AI. >_>
For the first Zeal Battle, I think I used Magus' second AI. I wished my memory extended past just the past few hours of my current existance.
--------------------------------------------------------------------------------
Title: Chrono Tweaker Link
Post by: MoonStoner on January 10, 2006, 01:00:06 am
--------------------------------------------------------------------------------
Where would I be able to find a copy of Chrono Tweaker? I searched the internet, and the link to the Compendium /files/ copy gives me a "Page not found" error.
ms
--------------------------------------------------------------------------------
Title: How To.........
Post by: ZeaLitY on January 10, 2006, 09:26:21 am
--------------------------------------------------------------------------------
http://cc.herograw.org/Black/Other/ChronoTweaker.zip
Headered Roms only at the moment. You can use SNESPal to add the rom.
--------------------------------------------------------------------------------
Title: How To.........
Post by: Agent 12 on April 05, 2006, 09:10:32 pm
--------------------------------------------------------------------------------
How to: make an enemy that walks around/fight
StartupIdle
-load enemy (remember prm has to be 3--?)
-set coordinates
-return
-move sprite
-move sprite
-go to (first move sprite)
Arbitrary 0
-explore mode off
-move party to right spot
-move enemy(s) to right spot
-scroll screen
-Battle!
-remove objects
-return
--------------------------------------------------------------------------------
Title: How To.........
Post by: Agent 12 on April 08, 2006, 02:26:15 pm
--------------------------------------------------------------------------------
How to: Get rid of Ozzies Fort Sprite (really any sprite but you have to do some trial and error)
1. Open overworld events
2. Look for LoadSprite(51) (this is Ozzies Fort fairly near the beginning), delete everything from this load sprite to the next load sprite
3. Click write memory and make note of the lines that are now bad "GoTo's"
4. Go delete those lines
Note: Make a copy of the Rom before any overworld event editing
Remember if you are having problems doing something you want to do in TF feel free to request
--jp
--------------------------------------------------------------------------------
Title: How To.........
Post by: Chrono'99 on April 11, 2006, 06:40:36 pm
--------------------------------------------------------------------------------
How do you remove the ballon & seagull sequence without removing Crono's renaming screen?
--------------------------------------------------------------------------------
Title: How To.........
Post by: Agent 12 on April 11, 2006, 07:50:24 pm
--------------------------------------------------------------------------------
How to remove that opening sequence:
There's two ways:
Overworld event editing
Open up 1000 AD events
Scroll down till you see [2ab]
In the middle of that you'll see "init memory" and then Command 28
leave the command 28 but you can delete all other commands below that
leave AddObjects Mem.XXXXX='s, the Change location, and the end
Update and write to memory
Note: this method I think switches to 1000 AD for like a tenth of a second
Location Event editing:
Open up location {000}
Under if(mem.70061=00) is a change location to 1F0 (above it is the change Crono's name dialogue box)
Change that location to 10F (instead of changing to 1000 AD map we just skip to the "wake up crono" map)
--jp
--------------------------------------------------------------------------------
Title: Re: How To.........
Post by: Agent 12 on April 28, 2006, 12:01:19 am
--------------------------------------------------------------------------------
Overworld Mapping
Mapping of overworlds is not intutive, particularly solidity and exits
The tiles of the overworld already have predetermined properties and though they can be changed this is not recommended unless your mapping from scratch.
Also they are determined by the lower level of the map (layer 2). So if you want to make something solid or "exitable" take off the top layer of the map and look at a tile that you know is solid or "exitable" (this can easily be done by checking "tile properties" under map. Then when you find the tile you want TURN TILE PROPERTIES OFF and then right click the tile you want and place it in the location that you want to be either solid or exitable.
--jp
--------------------------------------------------------------------------------
Title: Re: How To.........
Post by: Chrono'99 on June 26, 2006, 12:52:26 pm
--------------------------------------------------------------------------------
How to make an interruptable intro
Like this:
Quote from: jsondag2 on January 03, 2006, 10:14:32 pm
Change the Title Screen
Thank DDK for the new opening sequence
1. Open up Location {1b1} Title Screen.
2. Object 1 Arbitrary 1 has a "change Location at the end"
3. Change that Location to the location that you will have your new Title screen be
4. In the events of your new location make some sort of small intro, make sure at the end of the intro you have a change location {000} Load Screen
...but in the intro location events, add those commands in Object00 after the Return (delete the End):
-CheckButton (All, Type1)
--ChangeLocation {000}
-GoTo the checkbutton
Note that if you have some Pause or ScrollScreen in Object00 they will probably interfer with the Check Button, so move them to a new object.
Now if you push a button during your intro you will be teleported back to the load screen, just like in CT. Unfortunately this doesn't work for the Start button, but the other buttons are fine.
--------------------------------------------------------------------------------
Title: Re: How To.........
Post by: Chrono'99 on June 26, 2006, 04:37:37 pm
--------------------------------------------------------------------------------
And to prevent the Start button from pausing the game, you can put a Mem.000110 = 01 to disable the pause function.
--------------------------------------------------------------------------------
Title: Re: How To.........
Post by: Agent 12 on June 26, 2006, 07:16:49 pm
--------------------------------------------------------------------------------
On that note I'm pretty sure that stops all the buttons (menu, change characters etc)
--jp
--------------------------------------------------------------------------------
Title: Re: How To.........
Post by: Agent 12 on August 12, 2006, 01:58:18 pm
--------------------------------------------------------------------------------
Make a Conveyer Belt (I guess also can be how to make wind):
1. Choose tileset with Coneyer belt
2. Draw the belt
3. Open up Tile properties (window-->location-->tile properties)
4. turn on Movement (Map Movement (ctrl+7 to, if you are going to use TF alot learn the ctrl+??'s))
5. Set direction of converybelt under Wind direction
6. Set Speed (3 means you can't run against, 2 means it slows down if you run against)
Extra! (this is actually why I made this)
1. To change the direction of the conveyer belt draw the opposite direction of the belt somewhere off the scroll screen of the map (remember to put it's wind movement/speed)
2. Add the switch on the map and as an object
3. Open up it's activate
4. Put a copy tiles, make te source your new belt and it's destination your old belt (remember to drop the 3rd digit in coordinates)
5. In the unknown put "B"
Ta da.
I belive the copy tile "layer properties" only copies solidity. You need to set the unknown to something to change other tile properties (Z plane/wind direction etc). Because I have had the problem before, I learned to set it to B by looking at blackbird events.
Note: Mod's could you put all the non animation questions in the animation thread in this thread?
--jp
--------------------------------------------------------------------------------
Title: Re: How To.........
Post by: Chrono'99 on September 21, 2006, 05:48:46 pm
--------------------------------------------------------------------------------
The return of the How To!
How to prevent Crono from talking:
In textboxes, the tags {PC1}, {PC2}, and {PC3} can be written to insert the name of each character from the party. This is useful to make the party members speak with their names (like {PC1}: text).
However, to make sure that Crono doesn't speak one of those generic sentences, a small trick must be used. There are many different way to do it but this one is simple: Mem7e2980 is PC1 and is equal to 0 if it's Crono. So:
- Assign Mem7e2980 to some other free Mem
- If the other free Mem == 00
- Textbox ("{PC2}: the text")
- Go To (the rest of the code)
- Textbox ("{PC1}: the same text")
- (the rest of the code)
Thus, if Crono is in the first position in the party, the second character will speak for him. If Crono is not first (he may be second, third, or not in the active party at all) then the first character will speak normally.
--------------------------------------------------------------------------------
Title: Re: How To.........
Post by: Chrono'99 on October 02, 2006, 07:40:52 am
--------------------------------------------------------------------------------
To make doors: put the door tiles on layer 1, and in the tile propriety of the bottom door tiles, set the "door trigger" option to yes (simple, but the thing to remember is that there's no need to put the opened door tiles on the map and no need for CopyTile events).
--------------------------------------------------------------------------------
Title: Re: How To.........
Post by: Agent 12 on October 03, 2006, 02:08:16 am
--------------------------------------------------------------------------------
Ah, I never thought to put how to not make Crono talk in here, nice addition. It gets alot worse if you have another party member just sitting there (think how your talking to magus in CE), then you have to check PC1 and PC2 to make sure that it's not Magus OR chrono there.....
There was another thing I wanted to point out with doors though, I'm 90% sure the don't work for ALL doors, but i was wondering if maybe you knew for sure, I dont think they work for those big doors in the future (with the lights).
--jp
--------------------------------------------------------------------------------
Title: Re: How To.........
Post by: Zakyrus on October 18, 2006, 11:26:03 pm
--------------------------------------------------------------------------------
Sounds that get louder when you get closer(ambient?) using music ...sort of. Works good for "Running Water", "Hail Magus", or Dungeon Drip sound, even "Lavos Breath"
** represtents == = and such
set volume louder when getting closer
GetObjCoord(PC00, Xvalue, Yvalue)
If(Xpos or Ypos ** char_coordinates)
Soundcmd(SongVol, duration, volume)
If(Xpos or Ypos ** char_coordinates)
Soundcmd(SongVol, duration, volume)
If(Xpos or Ypos ** char_coordinates)
Soundcmd(SongVol, duration, volume)
--------------------------------------------------------------------------------
Title: Re: How To.........
Post by: Chrono'99 on March 21, 2007, 06:49:06 am
--------------------------------------------------------------------------------
How to change location with fade in/out effects:
In the first location, put:
- Pause(0.250)
- Darken(06)
- FadeOutScreen
- SoundCmd(SongVol, 18, 00)
- WaitForSilence
- Pause(0.250)
- ChangeLocation (variant DF)
In the second one, put in Object00 after the Return:
- Pause(0.875)
- Darken(F6)
- Pause(3.125)
Of course, the pauses are optional and can be adjusted to your liking.
--------------------------------------------------------------------------------
Title: Re: How To.........
Post by: Geiger on March 21, 2007, 08:16:43 am
--------------------------------------------------------------------------------
I believe variant E0 will automatically do a fade in/out, though it may not do it at the speed you like. It may also not handle sound the same way.
---T.Geiger
--------------------------------------------------------------------------------
Title: Re: How To.........
Post by: Chrono'99 on March 21, 2007, 08:58:49 am
--------------------------------------------------------------------------------
Yes, the darken command allows to adjust the speed of the fades, and the song this way is also faded. I find this code useful to hightlight special sequences such as ellipsises or "in the meanwhile" scenes.
--------------------------------------------------------------------------------
Title: Re: How To.........
Post by: Chrono'99 on May 01, 2007, 08:24:56 am
--------------------------------------------------------------------------------
How to quickly detect text corruption:
Just a little trick to quickly detect text corruption when you're working extensively on a location. Put a text command in Object00 right after the Return, with a short placeholder sentence like "Text{null}". Each time you'll enter the location in the game, this sentence will be shown before the rest of the events. This way, if the strings in the location get corrupted (they become non-ending garbage texts), you'll know it as soon as you enter the location. This is useful to avoid spending time coding something while not realizing that at some point the location strings became corrupted.
--------------------------------------------------------------------------------
Title: Re: How To.........
Post by: Agent 12 on May 16, 2007, 03:28:02 pm
--------------------------------------------------------------------------------
How to utilize the multiple planes feature:
This is a really cool feature and quite literally adds a whole new dimension to your map (i crack myself up). This is something that had bugged me for a really long time and actually now that I understand it it helps me realize what is going on in the maps alot more. First off what is the multiple planes? Well have you ever wondered how at one point in a map you can go "under' a bridge but then at then you climb a ladder walk around and all of a sudden you go right over the bridge...how does this work on a 2D map? Well it turns out it's all cause of planes.
Now I realized that there were planes while toying with TF but I never knew how to use them. It turns out it's actually really easy I just had been missing one piece. First off open a map and turn on the "Z plane" by going map -> Zplane or just press ctrl + 8 (you want to learn these shortcuts trust me). Then open up tile properties by going window -> location -> tile properties.
If your map already has 4 colors you can go on to the next step, otherwise you'll need to do the following:
Make a tile of Plane 1 (dark blue): in the tile properties window go Z plane make it Plane 1 and click a tile
Make a tile of Plane 2 (light blue): In the tile properties window go to Z plane make it plane 2 and click a tile
Make a transitional walkable tile (gray): In the tile properties window go to Z plane make it plane 2 and click a tile.
Make a transitional solid tile (pink): In the tile properties window go to Z plane make it plane 2 and click a tile.
Now that we have all of the Z planes we can start making a cool map. Now I know it's tempting to use solidity to make walls and such but if you are making a map with multiple planes you might as well use planes as walls (except for corners and such since Z planes don't have "corners).
Wherever Crono loads becomes the first plane that he is on. Whatever plane he loads on he can walk on and the opposite is solid. Now here's the cool part once Crono touches a "transition tile" (gray) the roles reverse I.E. if he started on dark blue then dark blue becomes solid and Light blue becomes walkable. Finally the pink is always solid. So in a nutshell, always make solid things pink (walls) make the ground blue and make the upstairs light blue. Then stick a transition tile at the top or bottom of ladders (or stairs).
What's even cooler is some tiles have different properties if crono is on a certain plane. I'm still working on mastering that but currently I just use pre - existing examples (one is grates in robot levels when you are on plane 1 crono is under them when you are on plane 2 crono is above them).
I'm working on a map right now so if I figure something out I'll add to this post.
--JP
--------------------------------------------------------------------------------
Title: Re: How To.........
Post by: Agent 12 on May 16, 2007, 10:00:44 pm
--------------------------------------------------------------------------------
How to Make Someone turn white (useful for teleporting and healing cutscenes)
Chickenlump posted this in a similar thread a long time ago:
Category: Memory Copy
Command: Multi-mode 88
MemCpy88
mode = 40
Param 1 = F
Param 2 = F
Param 3 = 2
Data leave blank
Pause(3 seconds)
Category: Memory Copy
Command: Multi-mode 88
MemCpy88
mode = 0
Put that in a characters (or NPC) arbitrary and then use Call object function to call it.
--JP
--------------------------------------------------------------------------------
Title: Re: How To.........
Post by: Agent 12 on May 17, 2007, 02:17:38 pm
--------------------------------------------------------------------------------
How to put more than one room on a map.
Credit again to chickenlump:
Ever wonder how some of the CT maps can have so many rooms close to each other but you still don't see them?
Well the easy answer is to use the "scroll" locks of a location but sometimes you don't want to use a whole bunch of for all these small rooms. Well thats where the RAM location of the scroll locks come into play.
Here is the memory locations for scroll:
7E1D1A: Left
7E1D1B: Right
7E1D1C: UP
7E1D1D: Down
(thanks to chickenlump for figuring this out)
First off since it's all one one big map you need to know which part of the map your character is in. Lucky there's a getObjectCoord command
Category: Object Coordinates
Command: GetObjectCoordinates
Variant: 22 (not sure this matters)
Mode: PC (your getting your playable character)
Obj/PC: 00 (there's always atleast one character in your party)
XCoord: 7F0220
YCoord: 7F0222 (these can be any temp memory)
Now that you know have the x/y coordinates you can know which room your character is in and set the scrolls appropriately. Here's an example. Imagine a map with 6 rooms in 2 columns, 3 rows. Put this in object 00's activate:
if(mem.7f0220 23) //he's in the Bottom row left column
mem.7E1D1A = 0
mem.7E1D1B = F
mem.7E1D1C = 23
mem.7E1D1D = 2f
return
//he's in the middle row
mem.7E1D1A = 0
mem.7E1D1B = F
mem.7E1D1C = 11
mem.7E1D1D = 20
return
You can do a similar thing for the right column. A few notes:
Object 00's activate gets called automatically after the player goes to a menu. That's why you put this code there (that way if they hit a menu and come back it's not reset.....this is also where you put code for copytiles that need to stay copied after a user hits menu).
Make sure you make your scrolls atleast the size of one screen otherwise there are bugs......and really annoying hard to figure out ones too.
--JP
--------------------------------------------------------------------------------
Title: Re: How To.........
Post by: Agent 12 on May 19, 2007, 02:48:27 am
--------------------------------------------------------------------------------
How to.....Force a cut scene, the easy way!
For the longest time I didn't know this....You'll notice parts of crimson echoes where you have to touch a very specific spot to do anything. Now you can easily set a whole "area" to trigger a scene. Through the power of getObjectCoordinates:
First off your going to need a loop that continuously checks coordinates do do this simply follow these steps:
//I chose the last two myself, as long as they are above 7f0200 it's fine.
getObjectCoordinates, variant 22, PC, 00, 7f0220, 7f0222 //store crono's pos in two memory spots
......//code goes here
goto line of get object coordinates
The goto command isn't the most user friendly. There's a very large drop down list and you have to find a very specific line number. But it's doable. Now in between those two lines you are going to put conditionals, for example if you want them to not cross a certain X coordinate you can do something like this
getObjectCoordinates, variant 22, PC, 00, 7f0220, 7f0222
if( 7f0220 >= (x coordinate)
- explore mode off
- begin cutscene
goto line of get object coordinates
If you wanted a specific block of the map to trigger a battle
getObjectCoordinates, variant 22, PC, 00, 7f0220, 7f0222
if( 7f0220 >= (x coordinate))
if (7f0222 >- (y coordinate)
- explore mode off
- move party
- move enemies
- move screen
- battle
goto line of get object coordinates
It really is that easy. Stick that code in any startup/idle object and have fun.
--JP
--------------------------------------------------------------------------------
Title: Re: How To.........
Post by: Agent 12 on May 22, 2007, 08:02:13 pm
--------------------------------------------------------------------------------
Here's a quick one for you. If you have your party spread out for a cutscene and you need to bring them back together really fast just use the partyFollow command (under sprite movement).
Note: Don't call this from within a PC's arbitrary.
--JP
--------------------------------------------------------------------------------
Title: Re: How To.........
Post by: Agent 12 on May 30, 2007, 02:14:48 am
--------------------------------------------------------------------------------
How to make a save point:
First off put a save point NPC on the map (for simplicity make the last digit of the object coordinates 0)
Next put an object at the same location as the save point
Now have a getObjectCoords for PC 00
If( X of PC 00 ) = (first 2 digits of object coord) // he's at the right X
If (Y of PC 00 ) = (first 2 digits of object coord) // he's at the right Y
if (Memory & bit)
If (a button is pressed) // he pressed A
Special Dialogue --Save (under category text)
go to getObjectCoords
play save point sound
set Memory bit
go to getObjectCoords
reset bit
go to get object coord
I'm not sure what the point is of setting the object Bit. In the example I pulled up it was
7f01CF bit 80. It may be a bit that allows Saving in the menu (just a guess hopefully someone can confirm this). But the main point is to check the X and Y coordinates of PC 00 (just drop the 3rd digit of the object coordinates).
--JP
--------------------------------------------------------------------------------
Title: Re: How To.........
Post by: JLukas on August 21, 2007, 06:58:34 pm
--------------------------------------------------------------------------------
Check for gold amount > 65535:
Use Memory Assignment commands to copy the 3 gold bytes (7E2C53, 7E2C54, 7E2C55) somewhere into the 7F02xx+ location event temp memory.
Then, use several If Statements on those bytes to check for the gold amount.
---
Example - check if 500,000G or more obtained ($07A120)
Assignment, Mem to Mem, Variant 48, 7E2C55 to 7F0200, Width 1 byte
Assignment, Mem to Mem, Variant 49, 7E2C53 to 7F0202, Width 2 byte
Comparison, Value to Mem, Variant 12, 7F0200, Value 07, Width 1 byte, Operation >=
Comparison, Value to Mem, Variant 13. 7F0202, Value A120, Width 2 byte, Operation >=
---
The second If Statement should be inside the first one. The code window will look similar to:
Assign(data)
Assign(data)
If(address >= 1 byte number)
If(address >= 2 byte number)
Code to use if gold amount or higher is obtained
Check the Game Clock:
This is very similar to the above example. Copy the clock bytes you want from the 7E0400-7E0406 range to 7F0200+ location event temp memory and use If checks. Read the Memory Locations.txt of the Offsets Guide from Geiger's Crypt to find out how the clock values are stored.
---
Basic example - check if game clock > 99:59:
Assignment, Mem to Mem, Variant 48, 7E0406 to 7F0200, Width 1 byte
Comparison, Value to Mem, Variant 12, 7F0200, Value 00, Width 1 byte, Operation >
---
--------------------------------------------------------------------------------
Title: Re: How To.........
Post by: Sora on August 29, 2007, 12:11:13 pm
--------------------------------------------------------------------------------
im trying to turn gato into something else, can you tell me how to make him, into something? also, is there a actor memory list thing?
--------------------------------------------------------------------------------
Title: Re: How To.........
Post by: justin3009 on August 29, 2007, 12:25:59 pm
--------------------------------------------------------------------------------
Um...It's right in the event coding if I remember. Load Enemy w/e Gato. Just mess around with that command.
--------------------------------------------------------------------------------
Title: Re: How To.........
Post by: JLukas on August 30, 2007, 12:28:22 am
--------------------------------------------------------------------------------
Quote from: Sora on August 29, 2007, 12:11:13 pm
also, is there a actor memory list thing?
http://www.chronocompendium.com/Term/Modification.html
has a text list of npcs, enemies, sound effects, etc.
--------------------------------------------------------------------------------
Title: Re: How To.........
Post by: Chrono'99 on October 21, 2007, 11:19:13 am
--------------------------------------------------------------------------------
How to change text color:
I don't know the details for it but apparently this command can change the color of the text in the dialogue boxes:
MemCpy2E(43, 09, 05, 01, 00)
This one makes the text yellow, but other variants are possible.
--------------------------------------------------------------------------------
Title: Re: How To.........
Post by: Zakyrus on October 21, 2007, 12:49:22 pm
--------------------------------------------------------------------------------
Here's how to hide/show Layer3 (used in Hunting Range for rain effect)
How to hide Layer 3:
7E0BD8 = 0
7F1521 = 0
MemCpy2E(54, 00, 16, FF, 01)
MemCpy2E(54, 18, 68, FF, 01)
MemCpy2E(40 17, 01, 00, 01)
How to show Layer 3:
7E0BD8 = 4
7F1521 = 4
MemCpy2E(54, 00, 16, F8, 08)
MemCpy2E(54, 18, 68, F8, 08)
MemCpy2E(40 17, 01, 04, 04)
Could be used to turn on/off rain, snow, etc, etc.
--------------------------------------------------------------------------------
Title: Re: How To.........
Post by: justin3009 on October 21, 2007, 11:53:23 pm
--------------------------------------------------------------------------------
MemCpy2E(40-5F
9
A
0 (55 = layer 2) (FF = Every layer except NPC)
9-A = Instant color change
40, 46-4F = Blue
40 - 42 = white
43 = Yellow
44 - 45 = White
50 = Black
51 = Red
52 = Green?(Says Shinrin)
53 = Yellow
54 = Dark Blue
55 = Purple
56-5F = Sky Blue
Thanks to Shinrin, we were able to find these colors. We think these are the only ones that are there, but meh.
--------------------------------------------------------------------------------
Title: Re: How To.........
Post by: Shinrin on October 22, 2007, 12:43:35 am
--------------------------------------------------------------------------------
These colors are used for other events. like the rain in the training grounds, what we did, was put the colors to the text. which someone else found, and we modified it
--------------------------------------------------------------------------------
Title: Re: How To.........
Post by: Chrono'99 on December 08, 2007, 06:13:03 am
--------------------------------------------------------------------------------
How to "control" sprite palettes
When too many sprites are in a location, some of them often appear with incorrect palettes, and they change if you open and close the menu or if you move away from them and come back (if they leave the screen and reappear).
To make sure that each sprite has a fixed palette, put a ChangePalette command in each sprite Startup/Idle. If the sprites are supposed to have different palettes, give a different palette number to each of them. The maximum allowed seems to be 7 (counting from 0, so it's 8 palettes); if you have a 9th sprite, it will either appear with the palette of the first one, or the contrary, and so on.
If some of the sprites are the same (NPCs, etc.) or if they are supposed to have the same palette, you can give them the same palette number. This is how the CT developers managed to have all these sprites appear in the End of Time: there are 8 different palettes (7 PCs + Gaspar), and the 9th and 10th sprites (the blue stars) actually use the same palette as Magus, if I recall correctly.
You can also change palettes "live" during events; it doesn't have to be in Startup/Idle.
--------------------------------------------------------------------------------
Title: Re: How To.........
Post by: justin3009 on December 08, 2007, 10:03:54 am
--------------------------------------------------------------------------------
So that's why my save points colors are screwed up! I kinda figured NPC's shared the same Palette as PC's because when I altered Ayla's palette, it altered Kino's. And I believe Robo's palette = Gaspar. So weird
--------------------------------------------------------------------------------
Title: Re: How To.........
Post by: Agent 12 on January 21, 2008, 11:38:39 pm
--------------------------------------------------------------------------------
How to....
Code a dungeon in an hour!
I've been around enough to learn a few tricks with coding CT dungeons, so I thought I'd share my process with you. This walk through is assuming you have already mapped out your area to your liking and you are ready to bring it to life. You should also have some background in TF. So Here we go!
Step 1:
Clear out the events. I use Lucca's Kitchen location, open up the events, highlight everything copy, open my location delete everything and paste. I think Lucca's kitchen has one command in object 00 to delete (can't open menu command).
Step 2:
In object 00 after the return statement put a get object PC0 command storing it to 7F0202 and 7F0204, save, close the events reopen the events and put a GOTO command and have it jump back to the get command, this is going to be your battle trigger.
Step 3:
Make object 8, this is your battle coordinator object, in it's startup/load just put a return and end.
Step 4:
Pick out square chunks on your map that will trigger battles, remember their X and Y coordinates and use Comparison -> value to mem to catch these locations as so:
if(7F0202 > X1)
if(7F0202 Y1)
if(7F0204 X1)
if(7F0202 Y1)
if(7F0204 < Y2)
if(7F0206 & 1)
GO get object coordinates
and inside the battle coordinator mark 7F0206 & 1
By following a template your code is easy to follow, and can be created faster.
--JP
--------------------------------------------------------------------------------
Title: Re: How To.........
Post by: Agent 12 on January 22, 2008, 12:02:39 am
--------------------------------------------------------------------------------
How to code timed events:
Creating timed events will use the internal game clock, I don't recall any timed events in CT, but the tools are certainly there to create one. This tutorial will remember the "second" that the timer was started and then everytime that second is seen we know a minute has passed, we will only allow 5 minutes to pass. Special thanks to JLukas for helping me out:
Step 1:
First off Pick the number of minutes you want to allow and store it to temporary memory
Mem.7F0202 = 05 //Player has 5 minutes
Step 2:
Get the current time, if your event spans multiple locations you will need to write it to permanent memory other wise write it to temporary memory. The seconds are stored in memory address 7E0401, in the below example I copy the address into temp memory and then store it in a permanent address, I use the temporary memory in the second location in case a second has passed between the commands.
Assign(Mem.7E0401, Mem.7F0204, One) //Copy start time second to work memory
Assign(Mem.7F0204, Mem.7F0042, One) //Copy start time second to more permanent address (across locs.)
Step 3:
Wait a second, otherwise we will instantly count down one of our minutes.
Pause 1.000 //Wait for 1 second so the following statement isn't triggered instantly
Step 4:
We are now going to begin the "loop" where we check the second and see if it is the second we started on:
Step 4a:
Get the current second, and keep it in temp memory
_CheckSecondLoop Assign(Mem.7E0401, Mem.7F0206, One) //Copy current seconds to work memory
Step 4b:
Check if it is the second we started on:
If (Mem.7F0204 == 7F0206) //If current second is equal to start second
Step 4C:
If it is then we will decrement one from the counter, if the event spans multiple locations make sure you save the time in permanent memory.
7F0202 -= 1 //decrement time
Assign(Mem.7F0202, Mem.7F0044, One) //save forever
Step 4d:
If the new time is 00 then they ran out of time!
If Mem.7F0202 == 00) //If out of time
Textbox (Bottom, "Sorry! Out of time.")
Goto _RanOutOfTimeArbitrary
Step 4E:
Otherwise we let them know a minute has passed. This can be done by assigning a memory address to 7E0200, which can be displayed in textbox values as {value 8}
Assign(Mem.7F0210, Mem.7E0200, One) // put in special address
Textbox (Bottom, "{value 8} minute(s) left!") //show textbox with value 8
Step 4F:
That is the end of the if statment for if it's the second we started on, if it wasn't the second we started on we, just redo the loop:
Goto _CheckSecondLoop
Step 5:
Finally in another arbitrary put code to handle when the run out of time
Woo.....so the final code looks like this
Mem.7F0202 = 05 //Player has 5 minutes
Assign(Mem.7E0401, Mem.7F0204, One) //Copy start time second to work memory
Assign(Mem.7F0204, Mem.7F0042, One) //Copy start time second to more permanent address (across locs.)
Pause 1.000 //Wait for 1 second so the following statement isn't triggered instantly
_CheckSecondLoop Assign(Mem.7E0401, Mem.7F0206, Two) //Copy current seconds to work memory
If (Mem.7F0204 == 7F0206) //If current second is equal to start second
7F0202 -= 0001 //Subtract 1 minute from counter
Assign(Mem.7F0202, Mem.7F0044, One) //Save Forever
If Mem.7F0202 == 00) //If out of time
Textbox (Bottom, "Sorry! Out of time.")
Goto RanOutOfTimeArbitrary
Assign(Mem.7F0202, Mem.7E0200, One)
Textbox (Bottom, "{value 8} minute(s) left!")
Goto _CheckSecondLoop
That's all there is to it, now you can add something that wasn't (to my knowledge) in CT.
Some other notes:
If you have battles then this could screw it up, so pause the game clock before a battle and restart it after a battle by storing FF to 7E0407
It also doesn't run if the status menu is open so disable the status menu by storing 1 to memory address 110
Value to Mem
Value = 1
Store To = 110
Width one byte
That's all for now, i'll keep you updated and remember if you want something else explained feel free to ask.
--JP
--------------------------------------------------------------------------------
Title: Re: How To.........
Post by: Kaktus021 on January 23, 2008, 11:07:38 am
--------------------------------------------------------------------------------
Quote from: jsondag2 on January 22, 2008, 12:02:39 am
I don't recall any timed events in CT, but the tools are certainly there to create one.
I'm pretty sure it's used for the drinking games, but I could be wrong.
Anyway, this would be great if you wanted to make a timed escape from Mt. Woe before it collapsed. Question is, would the timer still run in battle?
--------------------------------------------------------------------------------
Title: Re: How To.........
Post by: Agent 12 on January 23, 2008, 11:33:33 am
--------------------------------------------------------------------------------
Ah yes, I forgot about the drinking game, as for battles near the end of the post it mentions how to handle them
Quote
If you have battles then this could screw